Monthly Archives: April 2019

PROTO-CINEMA BLOG 20: CHRONOPHOTOGRAPHY

I really like Muybridge-style photography. I think my original interest in his photography/study of horses in motion has something to do with the development of my obsession of photography contact sheets. I like the idea of related/sequential images being presented together in the same sheet.

With that in mind, I decided I would present my photos side-by-side like Muybridges’s original horse photography.

I looked up how to take sports/burst photos on my iPhone since my model doesn’t have a sports setting programmed. After a bit of looking, I discovered all you have to do is hold down the button that takes the photo and the phone just keeps taking photos until you stop.

I did my photos of bowling, because I thought the pins flying would make a good photo. I’d like to eventually overlay the photos in Gimp to make a fun single image, but that would take me a long time to figure out, so I’m sticking to my initial plan of presenting them side-by-side.

It took me a few tries to get a usable photo. Originally, I tried to bowl and take the photos myself, but soon discovered that it is impossible to get the phone into position and the image zoomed and in focus before the ball impacted the pins. Thus, I enlisted the owner of the bowling alley in the Student Center to bowl and let me take the photos. Thus, here’s my series of photos:


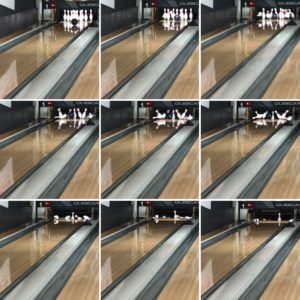
Figure 1: Bowling Chronophotography

PROTO-CINEMA BLOG POST 18: STEREOSCOPIC SLIDES

I made the viewer out of two types of black poster board: thin (regular) poster board and the padded (reinforced) poster board. I also used paperclips, duct tape, and a marker (as the handle).

Figure 1: Stereoscopic Slide Viewer


For the slides, I made a set of slides of Sunset Lawn Cemetery in Harrisburg, IL. I thought it was a nice ambiance and recreated many artifacts made during the height of spiritualism. Many trick photography, magic lantern, and stereoscopic slides sets dealt with the mystical or dreadful.


Figure 2: Slides


PROTO-CINEMA BLOG POST 17: THAUMOTROPES AND FLIPBOOKS

I don’t have my objects as I write this, we turned them in during the last class period. So, I will attempt to describe these as accurately as possible.

For my thaumotrope, I traced the opening of a mason jar on a piece of white cardboard. I drew a cat on one side and a window on the other, the image should look like a cat peering out the window. The “string” I used was some dental floss, I didn’t have another usable string. I tried thread but it didn’t work very well.

For the flipbook, I created about 30 images on post-it notes of a ball rolling up and down a hill. I glued the post-it notes together to make them more permanently connected.

Figure 1: Collage of my flipbook and thaumotrope

PROTO-CINEMA BLOG 16: MAGIC LANTERN

To figure out how to make a magic lantern, I read a lot of material. Including the readings from Virginia, the Magic Lantern Society, and The Historian’s Toybox.

Ultimately, I decided to make my magic lantern out of a box. Within a few days of the assignment, my Yoga Club subscription box arrived and it seemed like a perfect box to convert into a magic lantern. So that’s what I did. I cut a hole on one end and taped a LED flashlight inside. When I practiced with this, it wasn’t projecting my slides very well.

So, I showed it to you and you suggested I add craft paper or something to help focus the light of the flashlight. It made it darker, but the slides still appear blurry. Not sure what can be done about that.


Figure 1: A collage of my magic lantern and slides

PROTO-CINEMA BLOG 15: UPDATED CAMERA OBSCURA

Original camera obscura:

Figure 1: Front of original camera obscura


Figure 2: Back of original camera obscura


Blog post about making the original camera obscura: https://kharalukancic.hcommons-staging.org/2019/02/18/proto-cinema-blog-9-camera-obscura-creative-process/

Model camera obscura:

I tried modifying the original camera obscura multiple times and I just couldn’t make it work. I can’t get it to show a discernible image on the tracing paper viewer. I think perhaps the lens of the magnifying glass might be the problem. So, I found a model kit and made it. Here it is below:


Figure 3: Front of model


Figure 4: Back of model


Figure 5: Used a garbage bag to block light so I could get an image to photo


Photos:

Figure 6: Image 1 – a can


Figure 7: Image 2 – a clay figurine


Figure 8: Objects in the images