For this project, we were instructed to find a box that we could make completely light-tight. I immediately thought of an Apple box.
Thus, I decided to use the box from my Apple iPad Pro as my pinhole camera.
Additionally, I deliberately decided to keep the box as much as I could in tact; that is, I didn’t decorate it or cover up its logos. I like the idea of making my hands-on, amateur, inaccurate, and slow photography object out of the box of a piece of technology known for its precision and excellence. Something about taking a pinhole photo using the box for the iPad Pro, with all its retina technology, is very amusing.
So, I took my iPad Pro box and lined the inside with black paper (given to us in class). I then cut a square on the side of the box and taped a piece of a pop can over the cut square. I then pierced the aluminum with a needle and used the left over cut out piece of cardboard to cover the pinhole.
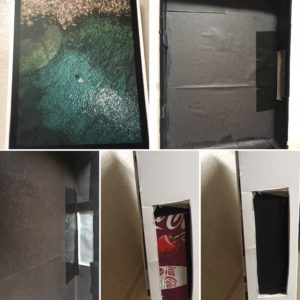
Figure 1: Collage (from my iPhone, humorously enough) of my finished pinhole camera. [Top row (left to right): Outside of box, inside of box with black paper. Bottom row (left to right): Cut opening with can and pinhole, same space from the outside, same space with the cardboard pinhole cover in place.]
Michael Potter, in our readings for this week says, “Quite often I find that surprise, delight and disappointment are all swirling around at the same time” [of the pinhole photography creative process]. I found myself identifying with this a great deal during my first time out taking a photo.
I went to the Japanese Garden outside of Faner to take my photo. It had all the promise of any unknown undertaking. I was excited to find out how the photo in my head as I was taking the photo would hold up to the reality of what was captured. Turns out, to my disappointment (but not so much surprise) my photo was underexposed and nothing is visible. It’s simply black.

Figure 2: Attempted photo of Japanese Garden and information about the photo